Welcome to the Growery Message Board! You are experiencing a small sample of what the site has to offer. Please login or register to post messages and view our exclusive members-only content. You'll gain access to additional forums, file attachments, board customizations, encrypted private messages, and much more!
|
 Some of these posts are very old and might contain outdated information. You may wish to search for newer posts instead. Some of these posts are very old and might contain outdated information. You may wish to search for newer posts instead.
|
 tonysoprano6379 tonysoprano6379
Registered: 02/02/09
Posts: 9
Last seen: 17 years, 2 months
|
 Simple DIY Aeroponic Perpetual Harvest system <all credit to stinkbud> Simple DIY Aeroponic Perpetual Harvest system <all credit to stinkbud>   4 4
#195142 - 02/12/09 04:41 PM (17 years, 5 months ago) |
|
|
Log in to view attachment
This is an awesome aeroponic tech that I found.
Harvest a Pound Every Three Weeks
By StinkBud version 1.1
Outdoor growers are heading inside now so I thought if might be a good time to start a tutorial on how you can harvest a pound every three weeks from a 7x8' closet.
I'll take you through my process from start to harvest.
What is different about my system vs. others?
1) 3 separate Aero/NFT flower systems allow me to run a 9 week flower cycle. This allows the buds to fully ripen and also allows me to run strains with more Sativa in them.
2) I use 100% organic nutrients for the sweetest tasting bud you can ever imagine.
3) I take my cutting from my vegetative plants. This way I can run 10 different strains without having to keep 10 mother plants.
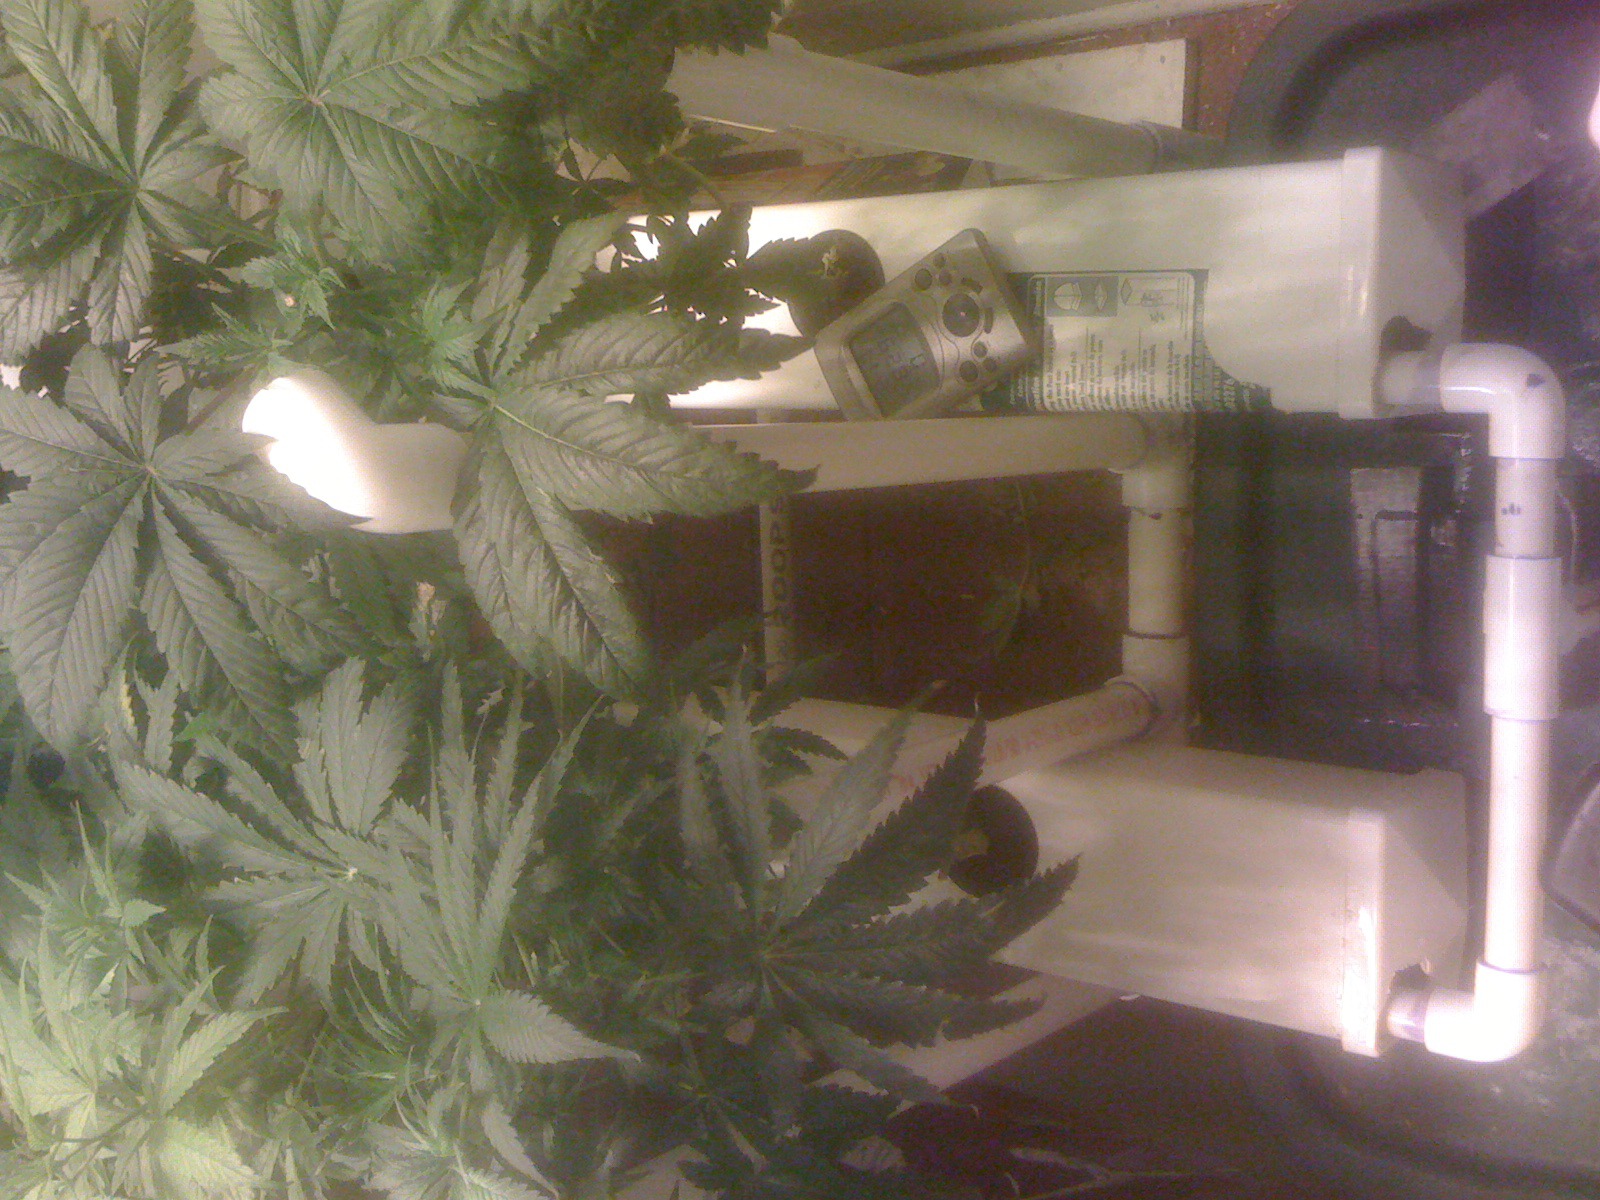
4) My system is all Aeroponic/Hydroponic or Aero/NFT. Each system uses the same sprayers and pumps. No medium is used. Basically the plants grow in air.
5) I have a 100% success rate with my cloner. This is by far the easiest way to take cuttings.
6) I always leach and then flush for at least 2 weeks for buds that burn and taste clean.
7) I run a three part cycle. The plants stay 3 weeks in the cloner, then 3 weeks in the vegetative system and then the move to flower for the last 9 weeks.
Anyone can do this! If you can read a number you will have the same success as I do. Everything is measured and it is as easy as baking a cake.
If you follow my instructions you too can harvest a pound every 3 weeks.
So here we go...
Into the Cloner
I take the 2"-4" cuttings and place them in the Neoprene sleeves and into the 2" net pots. No spraying, dipping or anything! Just stick them in the cloner and you’re done.
My cloner is homemade. I have a 100% success rate with this system. I use tap water with 150ml of Clonex clone solution although no rooting hormone is actually needed. It does root a little faster with the solution.
The cloner is running on the same timer I use for all of my aero setups. 1 minute on and 5 minutes off.
The clone system is under a 24", 2-light, HO fluorescent.
I use EZ-Clone sprayers for everything. I run a 396 GPH pump for all the systems also.
Use an 18gal. Rubbermaid Roughneck container for your clone unit. Everything else will leak! Trust me on this, I've tried them all.
1/2" PVC pipe is used for sprayer assembly. Use an 11/64" drill bit for the sprayers. Just screw the sprayers right into the PVC pipe.
Check out the plans for a more detailed example.
Roots pop within a few days.
After a few weeks the plants start to develop a nice root system. I don't feed them any nutrients yet.
After the cloner it's off to the vegetative system
After 3 weeks the best 14 plants move to the vegetative system.
I use a dual container aeroponic system. The roots grow straight down which makes the plants easy to transfer to the flower room when the time comes.
The plants are under a 250W MH light set to 18/6.
Again, all my systems are on the same timer set to 1 minute on and 5 minutes off. This gives the roots the maximum amount of Oxygen without letting them dry out.
I run this nutrient formula for vegetative growth:
Botanicare Nutrients:
126ML Cal-Mag Plus
180ML Liquid Karma
540ML Pure Bend Pro Vegetative Formula
I start at 1500 PPM and bring it up to 2000 PPM by the second week of veg. I change the nutrients every 3 weeks with each new crop.
I adjust my PH to 5.8
Power Outage
I recommend using a UPS like you would use on your computer. The size would depend on how many pumps you are using. Remember, the pumps only run for 1 minute every 5 minutes so they don't use much power.
A large UPS will keep your plants safe for days. Your ice cream is a different story though.
Of course during any power outage you will always be without light unless you have a generator.
Moving on to the flower room.
When the time comes I just pull them up out of the containers and move them into the flower room.
I have 2 - 1000W HPS for a total output of 290,000 lumens. My lights have vented hoods the take the air from one room and vents into the attic. That way my room is totally sealed to keep the CO2 in the room. I use a 440 CFM fan to vent my lights. Lights are run at night to help keep temps down.
I use an A/C unit during the heat of the summer but don't need it the rest of the year.
I use a complete greenhouse control system with CO2. I keep my CO2 at 1500 PPM during the day cycle.
I keep my humidity below 60% and have a 200 CFM fan that vents into the attic to keep humidity in check.
I'm running 3 separate Aero/NFT systems so I can have 9 weeks flower time and a 3 week perpetual harvest cycle.
I use a cycle timer for the pumps. The timer is set to 1 minute on and 5 minutes off. This allows maximum Oxygen to the roots without letting them dry out.
I made 3 separate Aero/NFT systems using PVC fence posts. The plumbing runs inside and is made from the same 1/2" PVC pipe I use for the cloner. EZ-Clone sprayers between each plant site.
14 plant sites. 396 GPH pump.
The frame is made from 3/4" PVC pipe. 18gal. Rubbermaid container for the reservoir.
Here is my formula for my flower room:
Botanicare Nutrients:
126ml Cal-Mag Plus
150ml Sweet
180ml Liquid Karma
540mlL Pure Bend Pro Bloom
The Mix
Mix all the nutrients in a spare gallon milk container. Add water and shake well. The whole mix will take an 18 gal reservoir to 2900 PPM.
Add about half of the mix and check your PPM. It will be low so you will have to keep adding nutrients until you get it to 2000 PPM.
It is easy to add more nutrients but hard to take them out If you go over you have to drain some nutrients /water from the res and add more plain water.
That's why you want to take it slow at first.
Always adjust your PH after you set your nutrients PPM.
Fill the res with water and start adding the nutrient formula until it reaches the correct PPM.
What PPM level you run depends a lot on what strain you are running. 1700-2000 PPM is a safe number to start at but some strains can handle over 3000 PPM.
Every couple of days I add water. As the plants use up the nutrients you will have to add more formula. It's really too easy!
All you need is a cheap PPM meter. You need a PPM meter that goes to at least 2000 PPM. Stick it in the water and read the number.
Same with PH. Just put the meter in the water and it will tell you the PH. If it is below 5.8 you add PH up. If is above 5.8 you add PH down.
Flushing 101
Have you ever smoked pot that has that smelled like freshly mowed lawn clippings and had a burning after taste? Did it snap, crackle and pop like a bowl of Rice Crispies?
You just smoked pot that wasn't flushed properly.
Flushing is one of the most important aspects of growing. Some will argue that it is not needed. Don't listen to them! Trust me on this, flushing really helps improve the smell and flavor of your bud.
I start my flush 2 weeks before harvest. I drain the reservoir and fill it with tap water.
I let the pump run constantly for about an hour to wash out any nutrients hanging around.
Then I drain the reservoir and refill it. I add 150ml of Clearex and let the pump run normally for 24hrs.
After one day I drain the water/clearex and run just straight water for the next two weeks.
I always keep my PH at 5.8
I check the reservoir every couple of days. If I see the PPM climb more than 50 PPM I'll do another reservoir change.
Your plants will start to turn colors during the flush. This is good. It means that the plant is using up all the available nutrients.
I've seen purple, red, yellow and blue during the flush.
At the end of 2 weeks your plants should be ready for harvest.
Harvest time!
Now it's time to reap the rewards of all your hard work!
Towards the end of your flush you need to start checking the trichromes with a strong magnifying glass or a microscope.
If you have a camera with macro capabilities you can use that to inspect the buds.
You are looking for the trichromes to turn from clear to cloudy. I like my mostly Indicas with a little amber in the trichromes but I like my Sativas so that the trichchromes are just starting to turn cloudy.
If you harvest early in the window the high will be more of a head high. Also the more you smoke the higher you get. This is called the ceiling of the high. Sativas are well known for this type of high.
If you harvest later in the window you will get more of a body high. You know that couch lock feeling you get when you smoke a lot of hash like bud. Indicas and Afghani are the strains I think of for a body stone.
Now you have to factor in the fact that different strains are a mixture of Indica and Sativa. Then take into account that each strain takes a different amount of time to finish and you can have your hands full in no time.
So it's a personal thing, not an exact science. You choose what you like best. There is no exact day you can harvest but the time when you harvest effects the final high of the bud.
For me it works out like this. I like two main types of medicine. The first is better for the day. The second works better for the evening.
My more Sativa strains are harvested at the early side of the window. This gives me that soaring, energetic high that keeps climbing the more you smoke. It's great for work and play.
At around 9 weeks the more Indica strains are very finished. This is late in the window for them. The high is very body like and medicinal. It works great for pain and nausea. Or when you need to get to sleep.
I get the best of both worlds at 9 weeks.
Time to cut.
So now we have watched the trichromes and decided it is time to cut our babies.
I use some gardening shears and just cut them off at the base. Once I cut all the plants I turn off the pump and let the roots dry out. That way it is not so messy with wet slimy roots everywhere.
You have two options with the plants.
1) Hang the plants to dry and trim the buds later.
Advantage: Hanging them up allows the maximum drying time. This allows the plants to get rid of any leftover nutrients in the buds so they taste nice and sweet.
Disadvantage: It takes longer to dry this way. It is harder to trim the buds. You have to watch for mold. A longer drying time could allow mold to develop.
2) Trim the buds now and put them on a screen to dry.
Advantage: It is a lot easier to trim the buds when they are fresh. Mold problems disappear. Faster drying time. If you need smoke, trim first.
Disadvantage: Not much if you have flushed properly. The buds could dry too fast. Crispy on the outside and wet on the inside. Putting the buds in a brown paper bag can be used to slow the dry down.
I do both and really can't tell the difference in taste. But then again I flush the hell out of my plants before I harvest.
It's a lot easier to pull a plant and trim it right then. That way you are done right away and can move on to maintenance.
Trimming and curing
If your stems snap when you bend them then your buds are dry and ready for curing.
Curing is the last process of growing. It allows the smoke to smooth out and taste better. Bud that is harsh to smoke right after drying will many times mellow out with time.
If you haven't trimmed the buds go ahead and do the dirty deed.
I cure my bud in the classic glass jars used for canning. Any brand will work fine.
Don't pack the bud too tightly, you want them to breath.
Open the jars a few times a day for the first week. Then open them every few days until they smell sweet.
If they start smelling funky then you didn't let them dry enough. Take them out and let them dry completely.
It usually takes a good 3 months for the best cure. Like fine wine the longer bud cures the better it will taste.
Maintenance and cleaning
Taking care of the different systems is really quite easy.
Every harvest I clean and change all the reservoirs.
Each system has a garden hose fitting and valve. I attach a garden hose and run the hose into the bathtub.
Open the valve, plug the pump in and drain the reservoir. Double check your hose so you’re not spraying water all over the bathroom!
Listen for a sucking sound from the pump. That tells you it time to unplug the pump.
Don't forget to close the valve at this time! I heard about a guy that sprayed water all over himself like a total idiot because he forgot to close the valve. I don't want to mention any names but it starts with stink and ends with bud.
Get a garden hose adapter for your sink and attach your hose. No need to haul water around unless you like that sort of thing.
Don't get stoned while you are filling your reservoir! Don't ask me how I know this...
After harvest I remove all the plant matter and clean everything with bleach water. I run a little bleach in the water for a couple of hours and then flush with plain water a couple of times.
I really clean the shit out of all my stuff every harvest. You want your grow rooms as clean as a hospital. Actually cleaner would be better.
I always have a complete set of clean sprayers. I replace the sprayers every harvest and put the dirty ones in a cup of soapy water. Then later I scrub the sprayers with my wife's toothbrush (just kidding).
That way I always have a clean set of sprayers ready to go.
CO2 basics
Time to talk about air. Your plants need lots of Carbon to make the sugar that powers growth.
The Carbon comes from the CO2 in the air. Your plants can use a lot more CO2 than what is in the air normally. That's where adding CO2 comes into play.
If you increase your CO2 to 1500 PPM you can increase your plants growth rate. I went from 12oz. to over 16oz. per harvest using CO2.
Don't mess with yeast or tablets or all that other crap. You have two real options.
1) CO2 tank
2) Propane burner
I've never used a propane burner so I'll talk about using a tank and regulator.
The cheapest way to use a tank is with a timer. Go to this site and put in your room's dimensions.
CO2 Calculator - Greentrees Hydroponics
Figure out what it would take to fill your room in 15 minutes and set your valve to whatever the calculator tells you to. Set your timer to come on for 15 minutes 5 times a day. Keep it off during the night.
You can check your CO2 level with a testing syringe. You can buy them at most hydro stores. You draw in 100cc of air and then push it through the glass test tube. You read the purple band and it tells you your CO2 PPM.
By far the best way to control CO2 is with a controller. The controller I use checks the CO2 level and turns on my tank regulator when needed.
Temps and Humidity 101
Let's talk a little bit about air quality.
The plants don't need fresh air, they need CO2.
Having to keep your temps down and bringing in fresh air can all be solved by going to CO2 and a dehumidifier system.
CO2 lets you run higher temps so you don't need to vent as often. Temps can be controlled by A/C.
The only thing you will have to worry about is humidity. Solved by a dehumidifier or vent fan.
I know, you can't afford all this right away. That's OK. You can add as you grow.
Start with vented hoods and vent them outside the room. I vent into my attic. Then when you can afford CO2, you will only have to hook up the input of the fan to draw air from outside the room.
You need plenty of oscillating fans in your room to keep the air circulated well. The leaves of your plants should be moving at all times.
Genetics 101
By far the most important aspect of your grow is choosing a good plant strain to start with.
The best system in the world will grow crappy buds if you start with crappy seeds. Now granted they will be BIG crappy buds but crappy none the less.
I'm not going to go into detail about everything. There are books for that. I just want to cover the basics in regards to my own personnel experience.
There are two main types of plants. Indica and Sativa. Some group Afghan as a separate type but for this discussion we will group Afghan with Indica. Let's not deal with Ruderalis strains because you can't clone them.
Indicas: Plants are short and stocky. Buds are dense and covered in resin.
Smell and taste goes from sweet to hash like. Smoke is dense and will make you cough. Load small hits or be prepared for the coughing frenzy of death.
They finish in a short time compared to Sativas. Usually within 8 weeks.
The stone is heavy and physical. Think couch lock.
My favorite Indica is Mango. It looks like a classic Afghan. Warning! Too many hits and its nap time. I'm not into pure Indicas myself. Love the taste but not the stone.
Sativas: Plants grow tall and lanky. Buds grow light and airy indoors.
Taste is sweet and fruity. Smoke is light and tasty. You can load hero hits and be the man about town.
Sativas take forever to finish, sometimes longer. You will be setting around for months saying "What the fuck"? 12 weeks to finish is not uncommon.
The stone is energetic and cerebral. A real creative high. The more you smoke, the higher you get. Smoke too much and you might get paranoid though.
My favorite Sativas are anything with Haze. Silver Haze is unreal! The first time I smoked it I got so fucking paranoid I just about shit myself! Think Speed Weed.
I wish I had the space and time to grow pure Sativas. Good thing that there are mixes that gives you the best of both worlds.
Indica/Sativa mix: This is pretty much all I grow. Anyone can find a strain that suits them best.
Finish times can be between 8-10 weeks depending on the strain.
The size can vary. Cropping may have to be used on taller strains.
Some strains have more Indica in them. My favorite is Blueberry. It is 80% Indica. It is by far the tastiest weed I have ever smoked. You have to grow this strain! Trust me on this. Great for movies and gaming.
Strains with equal Indica/Sativa are my main day smoke. AK47, Bubblegum, Purple Silver all fall into this category. They have an energetic high like a pure Sativa buy also have a nice mild body stone like an Indica. Balance is the key.
The most Sativa I run in a strain is 80% in my Skunk #11. I love that classic skunk taste and smell. I wish I could find a quicker and shorter variety of Skunk though.
So there you go. The condensed version of Genetics. You could write a book on the subject and still never cover everything. You have to start somewhere though.
Your success is 100% dependent on finding the right plant. Don't underestimate the importance of finding good genetics to start with.
In the Navy we had a saying...
Shit in, Shit out.
Let's talk about Aeroponics
I'd like to talk about growing in general and the concepts that produce fast growth. I'd to keep it simple so anyone can understand.
Plants have needs just like you and me. The biggest difference is that plants make their own food. To put it simply, plants make sugar and the sugars power plant growth.
So what does a plant need to make sugar? Carbon, Oxygen, Water and light. They also need small amounts of nutrients and of course Chlorophyll.
The plants take in the Carbon (CO2) through the leaves. They take in water and nutrients through the roots. What most people don't know is plant also take in their Oxygen through the roots.
Because plants give off Oxygen many believe O2 is a non issue. In realty it's usually the determining factor in maximum plant growth.
So if you look at what a plant need it's obvious where the bottle necks can occur.
Light is the most important element in any growing. Light is what powers photosynthesis. The more light the faster the plants grow, it's that simple.
Water and nutrients are a non issue. Why? Who has ever had a problem over watering and over fertilizing? I have. It's easy to give too much water and drown your roots. Too much nutrients and you burn the shit out of them. So the problem is not giving the plants enough water and nutrients...it's usually giving them too much!
Carbon is one of the building blocks of sugar. The plant needs lots of CO2 for fast growth. Normal air is between 200-500 PPM. Not much compared to what the plant can actually use. Plants can easily use 1500 PPM or more.
Oxygen is probably the most overlooked elements in plant growth. Even though plants give off more O2 than they take in, they still use a lot of Oxygen in the sugars they make.
My system addresses each one of these issues.
Light is right. You already know how to add more light.
Water and Nutrients are fed and monitored perfectly.
Carbon is added with a CO2 system.
Oxygen is the main advantage of my Aeroponic system.
Think of it this way...the plant breaths in Oxygen through its roots and out through its leaves. So imagine yourself a plant and let's do a test:
1) Dig a hole in some dirt. Stick your head in it and fill it back up. Now take a deep breath. This is what growing is soil is like.
2) Now fill a container with water and stick your head in it. Oh yea, don't forget to add some air stones first. Now take a deep breath. This is DWC.
3) Now just take a normal deep breath. This is Aeroponics.
Am I getting my point across?
Cloner Build Tutorial ver1.1
Step 1 – Cutting the ½” PVC Pipe
1) Cut eight 7” lengths .
2) Cut two 1½” lengths.
3) Cut one 2¼” length.
Step 2 – Preassemble Your Sprayer Frame
1) Start with the top “H”. It’s made from the 3 – Tees & two 1½” pipes.
2) Add the elbows to the tips of the “H”.
3) Add the 7” legs and end caps.
4) Attach the 2¼” pump connecting pipe to bottom of the “H”.
Step 3 – Drilling the Sprayer Holes
1) Measure and mark the sprayer holes according to the plans.
2) Use the 11/64” drill bit for the eight holes.
Step 4 – Drilling the Lid
1) Measure out 23 holes as shown in the plans.
2) Use the 2” hole saw to cut the holes.
3) Use the Exacto Knife to clean up the holes.
4) Cut a small hole with the Exacto knife just big enough for the cord to fit through.
Step 5 – Final Assembly
1) Place the pump and sprayer unit into the container and check to make sure everything fits well.
2) Take apart the sprayer unit and paint primer on the ends of the pipes and inside the fittings.
3) Start the final assembly on the sprayer unit. Be careful because the glue dries fast! Do only one
part at a time until the unit is completely assembled.
4) Screw in the sprayers. You may need to use a pair of pliers to get them in.
5) Cut down a neoprene collar to the size of the cord hole you cut in the lid.
6) Run the cord through the lid and neoprene collar. Don’t put the lid on yet.
Step 6 – Setup and Conclusion
1) Add enough water to cover the pump but don’t fill it over half way. We don’t want the roots to
hang in the water.
2) Add 150ml of Clonex solution to the water (optional) and adjust the PH to 5.8
3) Set your cycle timer to one minute on and five minutes off.
4) Put the lid on the container.
5) Fill the cloner with your favorite strains. Don’t spray the cuttings.
6) Enjoy your new cloner!!!! You should see roots within a week.
7) Don’t forget to pass the love on…
Vegetative unit tutorial vers 1.1
Step 1 – Cutting the ½” PVC Pipe
1)Cut seven 7” lengths.
2)Cut 1 10” length.
3)Cut two 1½” lengths.
4)Cut one 17¼” length.
Step 2 – Preassemble Your Sprayer Frame
1)Start with the top “H”. It’s made from the 3 – Tees & two 1½” pipes.
2)Add the elbows to the tips of the “H”.
3)Add the 7” legs and end caps.
4)Add the 10” drain pipe to the “H”. Do not attach the ball valve yet.
5)Attach the 17¼” pump connecting pipe to bottom of the “H”.
Step 3 – Drilling the Sprayer Holes
1)Measure and mark the sprayer holes (according to the plans).
2)Use the 11/64” drill bit for the ten holes.
Step 4 – Drilling the Lids & Containers
1)Measure out 18 holes as shown in the plans.
2)Use the 2” hole saw to cut the holes.
3)Mark the exact center inside the plant container. Cut a 2” drain hole.
4)Cut a 2” drain hole in the exact center of the reservoir lid.
5)Cut a 2” access hole in the corner of the reservoir lid so you can see and maintain water level.
6)Cut a 13/16” hole in the side of the plant container for the drain valve (according to the plans).
7)Use the Exacto Knife to clean up the holes.
Step 5 – Final Assembly
1)Place the sprayer unit into the container and check to make sure everything fits well.
2)Take apart the sprayer unit.
3)Start the final assembly on the sprayer unit. Start applying glue to each piece. Be careful because the glue dries fast! Do only one part at a time until the unit is completely assembled.
4)Screw in the sprayers. You may need to use a pair of pliers to get them in.
5)Put the pump in the reservoir and attach the down pipe.
6)Put the reservoir lid on and place the plant unit on top.
7)Connect the sprayer unit to the down pipe (pump).
Step 6 – Mixing the Nutrient Formula
Botanicare Nutrients:
1)126ML Cal-Mag Plus
2)180ML Liquid Karma
3)540ML Pure Bend Pro Vegetative Formula
Mix all the nutrients together in a gallon jug and top off with water. Shake well!
Step 7 – Setup and Conclusion
1)Add 15 Gal. of water. (approx.) to the reservoir
2) Add nutrient mixes until the meter reaches 2000 PPM
3)Adjust the PH to 5.8
4)Put the lid on the plant unit.
5)Fill the vegetative unit with your favorite strains from the clone unit.
6)Set your cycle timer to one minute on and five minutes off.
7) Enjoy your new vegetative unit!!!! You should see amazing growth rates.
Don’t forget to pass the love on…
Aero/NFT Tutorial vers.1.1
Step 1 – Cutting the ¾” PVC Pipe for the Frame
1) 4 - 41” lengths (label plant support)
2) 4 - 20” lengths (label “H”)
3) 6 - 4 1/8” lengths (label fence post holder)
4) 3 - 14 3/4” lengths (label 1- “H” and 2 -“end”)
5) 4 - 18” lengths (label plant support leg)
6) 4 - 12” lengths (label plant support leg)
7) 4 - 2” lengths (label end)
8- 2 - 12 1/2“ (label front)
9) 2 - 13 1/2” (label back)
Step 2 – Preassemble Your Frame
1) Start with the ends. Use 4 - Tees and 3 – 4 1/8” lengths to make the fence post holder.
2) Add the legs and bottom Tees. Don’t forget the front and back label!
3) Add the 2” pieces to the bottom of the Tees
4) Add the Elbows to the 2” pieces. Make sure the elbows are facing toward each other.
5) Connect the Elbows with the 14 ¾” pieces. The ends should be complete now.
6) Now make the bottom “H” using 2 - Tees, 4 – 20” pieces and 1 – 14 ¾” piece.
7) Connect the two ends together using the “H”.
8- Create your plant supports using the 4 – 41” lengths and 4 – Elbows.
9) Add the 12” and 18” plant support legs and place the plant supports into the frame.
10) If everything fits then take the unit apart and glue all the pieces together. Be careful, the glue
dries fast!
Step 3 – Assemble the Fence Posts
1) Measure and mark the 2" net pot holes (according to the plans).
2) Clean up the holes with the Exacto knife.
3) Put a large bead of Silicone inside 2 of the end caps and place them on the back end of the fence
posts.
4) Run a bead of Silicone around the edges of the end cap and let the posts dry
5) Cut the bottom ¼” off of the 2 end caps. Use a small drill drum sander to sand an opening for the
sprayer pipe assembly. A Dremel tool works well too.
6) Place the fence posts on the frame and use large cable ties to hold it in place.
Step 4 – Cutting the Sprayer Assembly Pipe
1) 2 - 3” lengths
2) 2 - 2” lengths
3) 2 - 47” lengths
4) 1 - 11 1/2” length
Step 5 – Assembling the Sprayer Unit
1) Drill ten 11/64” holes in the 47” length pipes according to the plans
2) Use pliers to insert the EZ-Cloner sprayers into the holes
3) Attach end caps and elbows to the sprayer pipes
4) Put the 2” pipes into the elbows
5) Combine the two sprayers together with a Tee
6) Add another 2” piece to the Tee and a downward facing Tee to that
7) Attach the last 2” piece to the Tee.
8- Attach the ball valve and garden hose adapter to the last piece
9) Try it out in the fence posts and if everything looks good, glue it all together.
Step 6 – The Container Lid
1) Put the container and lid under the fence post and draw a drain hole under the fence posts.
2) Cut out the holes with a utility knife and clean up the edge with the small drum sander.
3) Drill a 2” hole for the pump pipe.
4) Cut a large access hole with the utility knife. Leave one edge attached to make a flap that can be
closed.
Step 7 – Final Assembly
1) Place the pump into the container and run the 11 ½” pipe through the lid.
2) Put the sprayer assembly into the fence posts.
3) Put the container under the frame and attach the pump pipe to the sprayer assembly.
4) Apply a few small drops of silicon the drain end caps and place them on the fence posts. Don’t
use much silicon because you want to be able to remove the caps when needed.
5) Fill the containers and place empty net pots with collars into the fence posts.
6) Check for leaks. If everything is OK then you are done! Congratulations!!!
Step 8 – Mixing the Nutrient Formula
Botanicare Nutrients:
1) 126ml Cal-Mag Plus
2) 150ml Sweet
3) 180ml Liquid Karma
4) 540ml Pure Bend Pro Bloom
Mix all the nutrients together in a gallon jug and top off with water. Shake well!
Step 9 – Setup and Conclusion
1) Add 15 Gal. of water. (approx.) to the reservoir
2) Add nutrient mixes until the meter reaches 2000 PPM
3) Adjust the PH to 5.8
4) Fill the flower unit with your favorite strains from the vegetative unit.
5) Set your cycle timer to one minute on and five minutes off.
6) Enjoy your new Aeroponic system!!! You should see some amazing buds in no time!
7) Don’t forget to pass the love on…
|
tonysoprano6379
Registered: 02/02/09
Posts: 9
Last seen: 17 years, 2 months
|
Re: Simple DIY Aeroponic Perpetual Harvest system <all credit to stinkbud> [Re: tonysoprano6379]
#195143 - 02/12/09 04:43 PM (17 years, 5 months ago) |
|
|
Log in to view attachment
Next pdf
|
tonysoprano6379
Registered: 02/02/09
Posts: 9
Last seen: 17 years, 2 months
|
Re: Simple DIY Aeroponic Perpetual Harvest system <all credit to stinkbud> [Re: tonysoprano6379]
#195144 - 02/12/09 04:43 PM (17 years, 5 months ago) |
|
|
Log in to view attachment
3rd pdf
|
Oatman2000
-=Outa Space=-


Registered: 03/05/09
Posts: 203
Loc: Planetary Nebula
Last seen: 14 years, 6 months
|
Re: Simple DIY Aeroponic Perpetual Harvest system <all credit to stinkbud> [Re: tonysoprano6379]
#204037 - 03/08/09 05:30 PM (17 years, 4 months ago) |
|
|
wow! great info here... must have taken you forever to write this!
I will seriously consider this method! Thank You
 
--------------------
 Spawning to COIR Spawning to COIR
Building a flood table out of 2 kiddie pools
 Ebb and Gro - Buckets 2000w Ebb and Gro - Buckets 2000w
----------------------------

4-PO-DMT; 4-phosphoryloxy-N,N-dimethltryptamine
|
 travelleler travelleler
New and used cannabis seeds!!!

Registered: 03/12/09
Posts: 121
|
Re: Simple DIY Aeroponic Perpetual Harvest system <all credit to stinkbud> [Re: Oatman2000]
#208469 - 03/24/09 08:42 PM (17 years, 4 months ago) |
|
|
any photos in those other pdf files??
--------------------
    So, in summation: The CIA, with a little help from the Nazis, accidentally helped invent hippies while they were trying to figure out how to brainwash communists. So, in summation: The CIA, with a little help from the Nazis, accidentally helped invent hippies while they were trying to figure out how to brainwash communists.
Pour that on your granola and eat it, you zombie pinko bastards!"
|
Cuban Strain
Registered: 03/23/09
Posts: 14
Last seen: 15 years, 9 months
|
Re: Simple DIY Aeroponic Perpetual Harvest system <all credit to stinkbud> [Re: travelleler]
#230834 - 05/23/09 10:44 AM (17 years, 2 months ago) |
|
|
I know of two places to find this article, complete with pics and plans. One of which is the June 2009 High Times. Or you can download the file with pics and plans here.
|
nympholvr
Stranger
Registered: 09/08/09
Posts: 1
Last seen: 16 years, 10 months
|
Re: Simple DIY Aeroponic Perpetual Harvest system <all credit to stinkbud> [Re: Oatman2000]
#277418 - 09/08/09 11:36 PM (16 years, 10 months ago) |
|
|
hi i am new to this site and cloning altogether. has anyone made the cloner above and how did it do compared to an ez clone or power cloner thanks for such detail in the post and no disrespect just curious if homemade cloner will work better or worse than expensive ones thanks all for replies
|
azshroomer
Medical Marijuana Cultivator

Registered: 05/01/09
Posts: 464
Loc: Nor-Cal
Last seen: 15 years, 11 months
|
Re: Simple DIY Aeroponic Perpetual Harvest system <all credit to stinkbud> [Re: nympholvr]
#280200 - 09/14/09 03:30 PM (16 years, 10 months ago) |
|
|
See my signature for links to building your own aero cloner.
This is Stinkbuds system that he posted here. You can also find it in High Times and on Rollitup.org
--------------------
Check out my Grow The Growery teks!
 Building Your Grow Room Building Your Grow Room
Make Your Own Aeroponic Cloner
Make Your Own Aeroponic Veg System
Make Your Own True Grow Room
Make Your Own Aeroponic Flower System (COMING SOON)
|
icanfeeltherain
Newb Mycologist

Registered: 10/26/08
Posts: 53
Last seen: 16 years, 1 day
|
Re: Simple DIY Aeroponic Perpetual Harvest system <all credit to stinkbud> [Re: azshroomer]
#367994 - 02/19/10 12:52 AM (16 years, 5 months ago) |
|
|
I love the ingenuity of this tek! If one were to utilize this tek would 6'x 2.5' be enough floor space to effectively house one flowering unit and its fourteen plants? Perhaps with a 400w HPS and plenty of air circulation? What kind of yield would be expected this space which equates to a little more than a square meter?
--------------------
"We are here to awaken from the illusion of our separateness" - Thich Nhat Hanh
"Yes, Cuban B."
|
Soulbrotha
Old School

Registered: 03/23/10
Posts: 5
Last seen: 16 years, 3 months
|
Re: Simple DIY Aeroponic Perpetual Harvest system <all credit to stinkbud> [Re: icanfeeltherain]
#393051 - 03/31/10 12:07 AM (16 years, 4 months ago) |
|
|
What about the specs listed? In stinkbuds aero system he doesnt mention the size of type of fence posts needed. Also the specs of the pipes, etc dont seem to add up to the specs of the 18 gallon rubbermaid suggested.
|
wishcouldeletethis


Registered: 04/20/08
Posts: 675
|
Re: Simple DIY Aeroponic Perpetual Harvest system <all credit to stinkbud> *DELETED* [Re: tonysoprano6379]
#393069 - 03/31/10 12:59 AM (16 years, 4 months ago) |
|
|
Post deleted by lampshadehelmetReason for deletion: d
|
Soulbrotha
Old School
Registered: 03/23/10
Posts: 5
Last seen: 16 years, 3 months
|
Re: Simple DIY Aeroponic Perpetual Harvest system <all credit to stinkbud> [Re: wishcouldeletethis]
#393076 - 03/31/10 01:16 AM (16 years, 4 months ago) |
|
|
Yes, after chatting to several people who have used similar systems to his, they told me to use a DWC Bubble system because its so much cheaper and easier. You can also fit more plants into less space and it only takes a couple weeks more to grow them.
I'd still like to try something similar to stink buds one day, but his specs explanations are terrible imho.
|
purpledrifter
Stranger
Registered: 06/06/10
Posts: 1
Last seen: 16 years, 1 month
|
Re: Simple DIY Aeroponic Perpetual Harvest system <all credit to stinkbud> [Re: tonysoprano6379]
#429254 - 06/06/10 12:44 AM (16 years, 1 month ago) |
|
|
I have this system. The crowding of the roots is the main problem. If the roots become too crowded, your leaves will start to yellow. I do not know if this is because they become too waterlogged or grow fungus or what. I just know from experience it will cause problems. When he says to move the plants to new posts, it is mainly to break up the roots so they don't get too crowded. In other words, do not make the mistake of not moving the plants to new fenceposts when you go to the flowering stage. And also, the roots will want to grow into your reservoir. Do not let them; cut them off.
|
keepITLegalFellas
airo trials

Registered: 10/12/10
Posts: 27
Last seen: 15 years, 6 months
|
Re: Simple DIY Aeroponic Perpetual Harvest system <all credit to stinkbud> [Re: Soulbrotha]
#493778 - 10/31/10 07:06 AM (15 years, 8 months ago) |
|
|
If you decide to build one from stinkbud, pick up an extra 6 or 8 3/4" T's His count was wrong.
--------------------
I do not condone or condemn. This is my disclaimer, as all my post are complete fiction. Furthurmore any reason for lurking here is swim's and does not concern me.
|
keepITLegalFellas
airo trials
Registered: 10/12/10
Posts: 27
Last seen: 15 years, 6 months
|
Re: Simple DIY Aeroponic Perpetual Harvest system <all credit to stinkbud> [Re: keepITLegalFellas]
#494165 - 11/01/10 08:45 PM (15 years, 8 months ago) |
|
|
I've thought of using an old style cool mist humidifier, but not sure how it would hold up to a cycle timer and they are a bitch to plumb. Dont ask how I know.
--------------------
I do not condone or condemn. This is my disclaimer, as all my post are complete fiction. Furthurmore any reason for lurking here is swim's and does not concern me.
|
keepITLegalFellas
airo trials
Registered: 10/12/10
Posts: 27
Last seen: 15 years, 6 months
|
Re: Simple DIY Aeroponic Perpetual Harvest system <all credit to stinkbud> [Re: keepITLegalFellas]
#494167 - 11/01/10 08:47 PM (15 years, 8 months ago) |
|
|
--------------------
I do not condone or condemn. This is my disclaimer, as all my post are complete fiction. Furthurmore any reason for lurking here is swim's and does not concern me.
|
Ursmare
Uncle
Registered: 10/19/10
Posts: 6
Last seen: 15 years, 8 months
|
Re: Simple DIY Aeroponic Perpetual Harvest system <all credit to stinkbud> [Re: keepITLegalFellas]
#495043 - 11/04/10 12:54 PM (15 years, 8 months ago) |
|
|
Quote:
I take the 2"-4" cuttings and place them in the Neoprene sleeves and into the 2" net pots. No spraying, dipping or anything! Just stick them in the cloner and you’re done.
Does this mean the cutting is just dangling in the air under the neoprene, with the leafy part sticking up toward the lights? There no medium in the cups?
|
Ursmare
Uncle
Registered: 10/19/10
Posts: 6
Last seen: 15 years, 8 months
|
Re: Simple DIY Aeroponic Perpetual Harvest system <all credit to stinkbud> [Re: Ursmare]
#495140 - 11/04/10 05:40 PM (15 years, 8 months ago) |
|
|
Harvest one pound per week, so it says, but the photos of the room show 3 systems in varying stages. Does that mean that one pound comes from 3 systems? Or just one? Each unit is aprox. m2. 3 systems would produce 52 lbs. per year. The pictures not sorting with the general description has confused me. Sorry!
| |
|
|
|
|